

Are you looking for some gas struts but are you not sure which gas struts are right for your application? Or are your current gas struts in need or replacement? You have come to the right place to get an answer on these questions, Gasspringsshop.com is the place for gas struts and mounting parts. However, once you own these objects, there already is another bottleneck: the gas struts installation. It is extremely important that you install your gas struts correctly, otherwise you could damage your new gas strut or even your application, such as a cabinet door, furniture, awning window and attic ladder. That is why we are offering you a helping hand. We will spill all the details on a gas struts installation and what you can do to maximize the lifespan of your struts. Read further.
Gas struts installation guide
Let’s jump right into what brought you to this page: the gas struts installation guide. Follow the steps below for a guaranteed successful installation!
Step 1: Calculating and preparations
We can say with great certainty that this is the most important step in the installation process, namely determining the right gas strut for the application. If you do not calculate the dimensions of your gas strut correctly, it may not fit (properly). You can use our configurator tool if you are already familiar with the type of application (such as a boat hatch). If you do not yet know all the technical details and are unfamiliar with gas struts, we recommend using our calculator tool. You can use both tools very easily by filling in all the requested information. Are you not completely satisfied with the results of the tools? Then you can simply make a new calculation again because it is completely free!
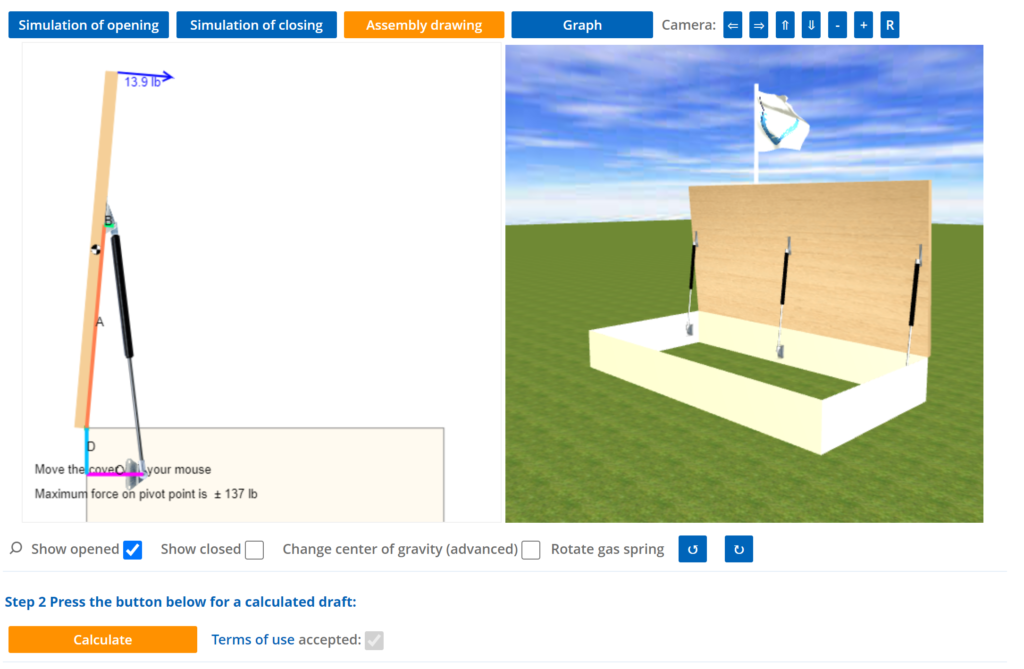
Was the above step still a little too fast? Then watch this video, in which we give a demonstration of our calculator tool!
Pro tip: you can save the outcome of the calculator / configurator tool. You will need the results later on during the gas struts installation.
Step 2: Ordering your gas struts and mounting parts
Are you satisfied with the outcome of your gas struts? Then it is time to order your calculated gas struts and mounting parts! Did you know that we always strive for lightning-fast delivery? And if you made a tiny mistake while calculating your gas springs that made them unsuitable for your application, you can simply return them. More information about that here.
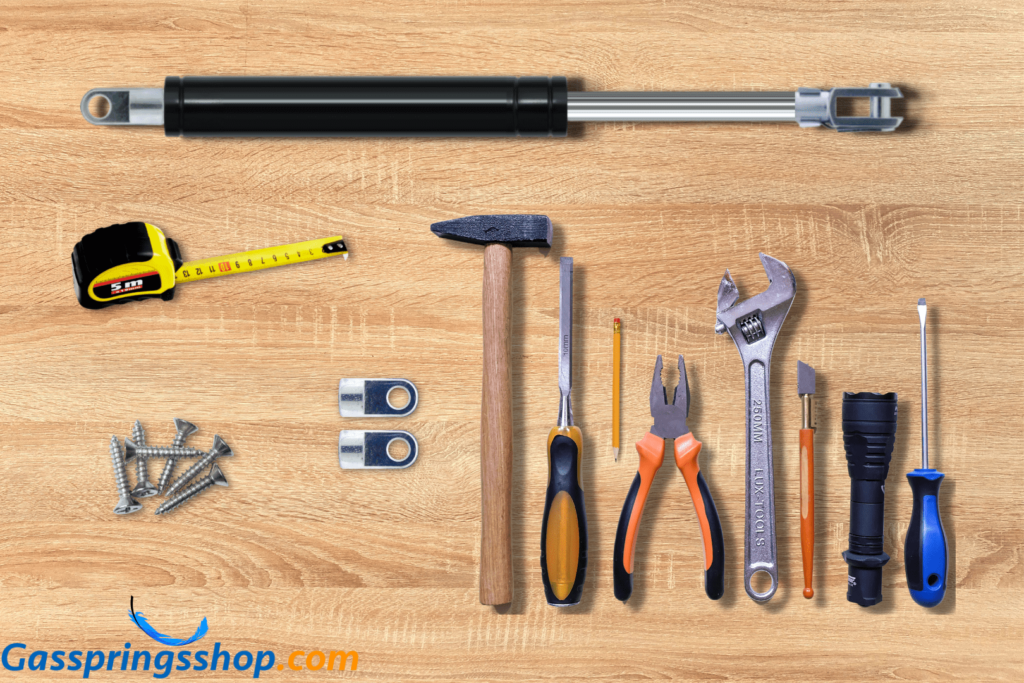
Step 3: Marking the inch points
Have you received your gas struts? Then it’s time to start the gas struts installation! The first thing we are going to do is mark the screw points. Did you save the outcome of the calculator? Fabulous! You will need the inch points – which are the outcome of the calculator tool – to mark the screw points on your application. It is extremely important that you mark these screw points on your application with extreme precision. If you are even one inch off, there is a chance that the gas strut will not fit properly on the application. A tape measure is therefore indispensable at this step.
Step 4: Gas struts installation
Have you marked the screw points and checked whether they exactly match the results of the calculator tool? Then it’s finally time to start the last step! Before screwing the mounting parts onto your application, make sure that your struts are set to their extended state. Do you have a drill and some screws ready? Then you can now screw the mounting parts onto your application. For optimal results, we recommend using stainless-steel self-tapping screws to attach each mounting part.
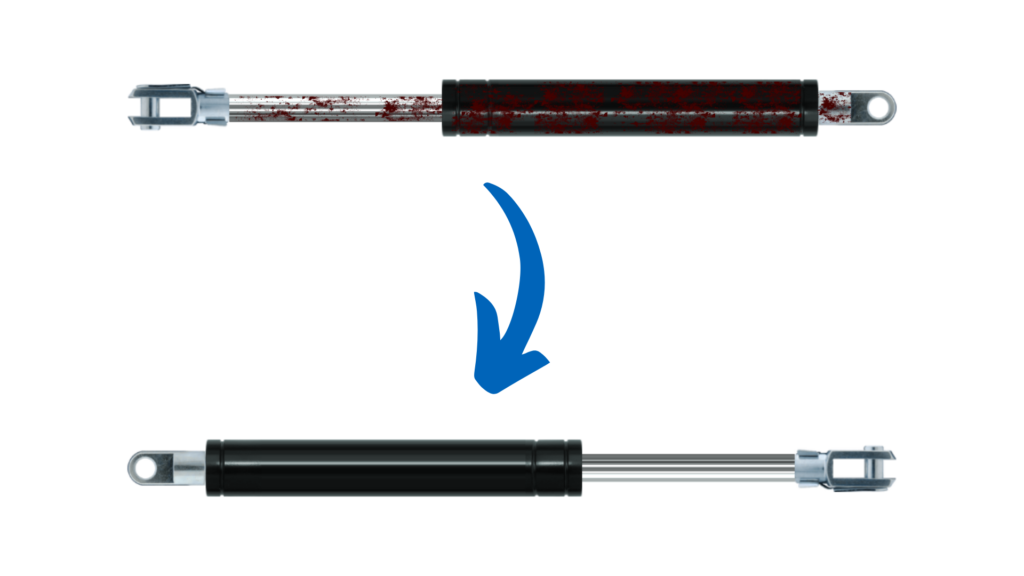
After screwing the mounting parts on your application, the only thing left to do is snapping the gas strut itself into place. You can do this easily by snapping the extended strut onto the mounting parts. Once you hear – click – you know that the gas strut is properly secured. The image below shows in which direction the gas struts must be clicked into place. Also make sure you mount the gas strut with the narrow rod end lower than the gas-filled piston.

Pro tip: Make sure you execute the gas struts installation with two persons. That way, one person can keep the application lid in position while the other person installs the gas strut!
Are the last two steps still a bit unclear? In the image below we zoom in a little deeper on these steps. Useful!

Replacing your gas struts
What can you do when you have already installed gas struts on your application but they need to be replaced? Maybe they are rusty or do they no longer work properly? Anyway, we can imagine that you do not want to deviate from your current type of gas strut. That is why we at Gasspringsshop have introduced the replacement search function. For a number of renowned brands, such as AL-KO, Bansbach, Airax Rayflex, Stabilus Lift-O-Mat, Lesjöfors and Suspa Liftline, we offer replacement gas pressure dampers. It’s super easy to use, all you need to use this tool is the article number of your current gas strut! As soon as you enter the article number of your current gas strut in the replacement search function, you will see an overview with the suitable / similar gas struts. Very useful! And perhaps you already guessed it, this tool is also completely free!
Do you not (any longer) have the article number of your current gas strut? Then we recommend using the configurator tool, since you are already familiar with the technical aspects of your application. Are you having a hard time finding the part number of your Stabilus-O-Mat gas spring? We have a video in which we tell you how to find your part number! Now that is convenience!
How to maximize the lifespan of your gas struts
In general we can say that a gas strut usually can be operated around 40,000 times. However, the life of a gas strut depends on several factors. First of all, the environment plays a role. For example, are you planning to place a gas strut outside? Then always choose a stainless steel gas strut, as it can withstand rough weather conditions such as snow, rain and hail. The environment temperature also plays a role in the lifespan of gas struts. It is also important to use stainless steel screws. However, we recommend that you always use these types of screws – both for indoor and outdoor use.
Of course, it is also important to use the right type of gas strut. For example, if you want to easily lift a very heavy boat hatch, you should certainly not opt for a gas strut with a Newton force up to 200N. The force from the boat hatch can cause the gas strut to break. Do you want to know which gas strut is suitable for a boat hatch? Then use our configurator tool!
Are you ready to order and install your gas struts?
Do you know how to get started with your gas struts installation? And can’t you wait to provide your application with nice handy gas struts? Great, then we recommend that you immediately start calculating your desired gas strut. Use our calculator / configurator tool (or use the replacement search function when looking for a replacement) and order directly online. Are you perhaps still not sure on how to use our tools or on how to install your gas struts? Then please don’t hesitate to contact us. We can help you find the right gas strut and mounting parts for every application! If you have any other questions, you can either take a look at our FAQ where a lot of questions are already answered or you can send an email to [email protected].
